Early 88 Merkur Scorpio Restoration Project

Documenting your big project with photos/videos? Have photos/videos to share of anything Merkur related? Place your links to photos and videos here. Please - Merkurs and Merkur-related pictures only. Cosworths welcome!!
Carlisle and event related pictures are to be placed in the relevant section under 'Events'.
Post Reply
Merkur Club web site
FocusSVT
Level 5
Level 5
Posts: 715
Joined: Tue Aug 08, 2006 12:55 pm
Location: Andover, Ks.

Early 88 Merkur Scorpio Restoration Project

Post by FocusSVT »

It is time to start documenting the slow restoration of my early 88 Scorpio here. I have posted a lot in the Scorpio section, but I think it is more appropriate to document the actual restoration here.

Brief History on the Car

Rescued from Texas, abandoned in a neighborhood. A guy posted on Craigslist and here if I remember correctly, that is was available if someone would come and get it. It wasn't running (bad PIP later diagnosed) and no title. I towed it back to Kansas, almost got caught in a big hail storm outside of Oklahoma City. Took three months, but got a title for the car, fixed the no start issue, registered it in Kansas, fixed the odometer, and drove it sporadically for a month or two before the front seal on the transmission blew out. Since then I haven't had a lot of time to work on it.

That being said I did get most of the exhaust removed from the car this weekend in preparation of removing the transmission.

I also took some time and restored the headlights on the car. They were very yellowed. I used a 3M product

Image

Here are few before pictures

Image

Image

After

Image

Image

It doesn't look that dramatic, but the improvement was 100%. I also performed this on my 2003 Focus SVT and it was a very dramatic improvement.

I will post other projects as I can.

Have a great weekend.
Darren Needham
Andover, Ks.
FocusSVT
Level 5
Level 5
Posts: 715
Joined: Tue Aug 08, 2006 12:55 pm
Location: Andover, Ks.

VICTORY!

Post by FocusSVT »

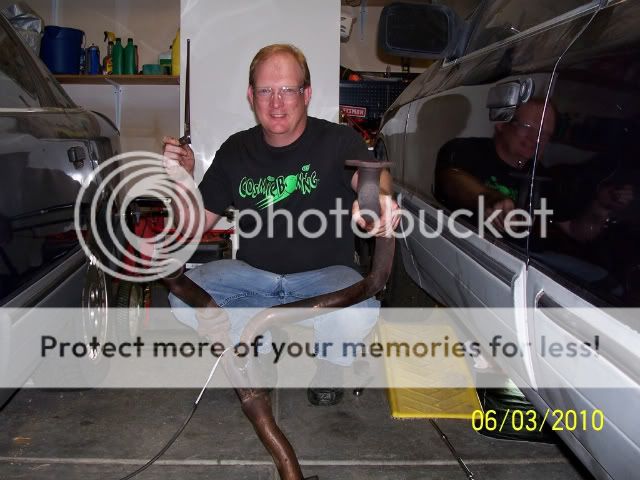
I just had to post this pic of me holding the y-pipe out of the Scorpio like a trophy.

Image

What a PIA to get out. Without the IRWIN nut & bolt extractor set I got from Oreilly's I never would have gotten it out.

Image

Image

I spent three days trying to get two bolts out. I totally butchered one bolt

Image

With the IRWIN set I was able to remove it in all of one minute. The drivers side bolts took all of 15 minutes to get out. That was mainly I was trying to figure out the best way to get levereage on them. I had soaked both sides with penetrant, but nothing worked until I used this set. Well worth the $23 I spent tonight :)
Darren Needham
Andover, Ks.
FocusSVT
Level 5
Level 5
Posts: 715
Joined: Tue Aug 08, 2006 12:55 pm
Location: Andover, Ks.

Small progress with the transmission

Post by FocusSVT »

I finally got the transmission out earlier this week. What a total PITA. Anyway I have replaced the front seal, but am having problems getting the torque converter to fully seat on the input shaft. Nothing has been easy with this job. If I can't get it to seat properly in the next couple of days I may contemplate taking it to a trans shop to have them do it. Might be worth the $25-50 bucks to have them do it :x

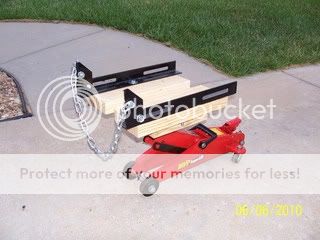
My make shift transmission jack adapter. The one I had purchased wouldn't work with my floor jack. This was fine until I tried to get the transmission out from under the car. The jack sets too high, so I had to wrestle the transmission onto another 2X10 and then slide it out from under the car. Getting it back under the car will be interesting :x

Image

You may notice how far back the torque converter is sitting inside the bell of the transmission. This is how it should look before I re-install the transmission. So far I can't get it to re-seat this far back :(

Image

Here is the transmission with the torque converter removed. The inside was actually this clean. I did touch it up just a little, but not much.

Image

Here is the old and new seal with the seal puller behind. I got the puller at Harbor Freight for $8 and the new front seal from poormans auto supply for $8.50. The brand is ATP.

Image

I will post some pics and progress reports after I get the torque converter squared away.
Darren Needham
Andover, Ks.
FocusSVT
Level 5
Level 5
Posts: 715
Joined: Tue Aug 08, 2006 12:55 pm
Location: Andover, Ks.

Transmission installed!

Post by FocusSVT »

I finally got some "quality" time to work on the car over the weekend. The transmission is fully instlalled, all of the bits and pieces are back. The only thing left is the driveshaft and exhaust. I need to replace the rear u-joint and install a new oxygen sensor. As soon as those two things are done, it should be driveable!

The only issue I really had to deal with, besides the whole transmission removal and installation, was dealing with a bad radiator. I purchased one from merkurdepot for a great price. The challenge is it is a 5-speed radiator, so no transmission cooler. I purchased a plate and fin cooler from cfrperformance.com for $40. It is rated for a full size vehicle pulling 2500 lbs (supposidly). Anyway, I realized after I got the cooler that I didn't know where to install it. It was too big to fit in front, or underneath for that matter. I also wanted the installation to look somewhat professional.

My solution for now was to install the cooler behind the radiator in front of the clutch fan. According to the installation instructions this will cause the cooler to lose about 40% of its cooling capacity. I hope this means it will still be better than the stock arrangement. Below are some pictures.

Image

Image

Image

Image

Image
Darren Needham
Andover, Ks.
FocusSVT
Level 5
Level 5
Posts: 715
Joined: Tue Aug 08, 2006 12:55 pm
Location: Andover, Ks.

Re: Early 88 Merkur Scorpio Restoration Project

Post by FocusSVT »

I have done a lot to the Scorpio since I last updated this page, so I won't go into too much detail.

Things I have done to the car:

Used a different transmission cooler and mounted it up under the front bumper to allow it to get some air. The configuration above did not work well. It became a transmission heater instead of cooler :oops:

Here is the current configuation

Image

From there I replaced the struts and shocks, control arms and tie rod ends. Had an adventure when trying to use urethane bushings with some control arms I got off eBay

Image

Some aggressive measures were necessary on the inner bushings to get them to seat in the arm. Won't do that again :x

Put new pads all four corners. Had to do some work on the right rear caliper, the dust boot had partially come out of the cylinder.

Discovered at this point that the brake fluid was like molasses. I purged and put all new fluid in the car. I discovered at this point that the ABS accumulator was either plugged up with this mess or the pump had failed. Either way, the only solution was to get the accumulator out of the donor car. Thank goodness that one worked :)

Picture of the plugged up filter in the brake fluid reservoir

Image

The next project was replacing the very noisy blower motor. I found a Behr brand motor with squirrel cages on eBay for about $150. The cages weren't aligned correctly, so a trip to my father-in-law's house and use of his press fixed that

Before

Image

After

Image

I finally got the the unit installed this fall.

A few pictures of the install

Image

Image

All cleaned up

Image

Image

Image

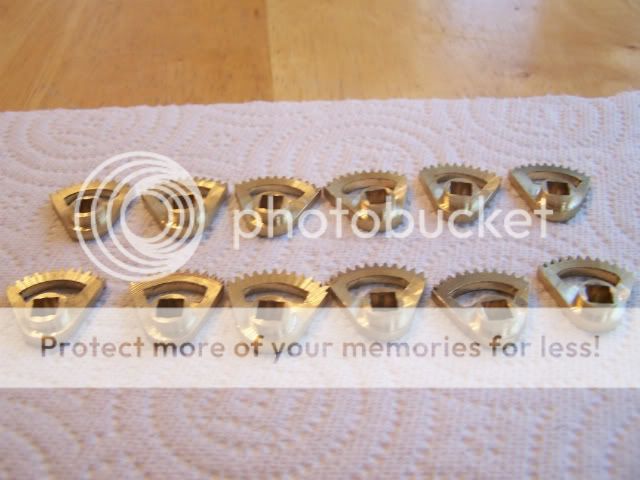
On a side note, I had initiated an effort to get replacement gears made for the vent door motors that fail so often on the Scorpio. They weren't cheap. In the end I had 4 sets ordered (12 gears) Unfortunately I was unable to afford a set for myself ($205) for the set, but I hope I helped out the other four guys who ordered the gears. I hope to do another order next spring, hopefully I can get some then.

Image

I recently replaced the broken hood release cable on the car. My parts car has paid for itself over and over again :)

Over time I have been slowly upgrading the Scorpio's sound system.

In the doors I was able to put Blaupunkt 5 1/4 midwoofers

Image

In the dash I put Soundstream 2-way 3 1/2" speakers

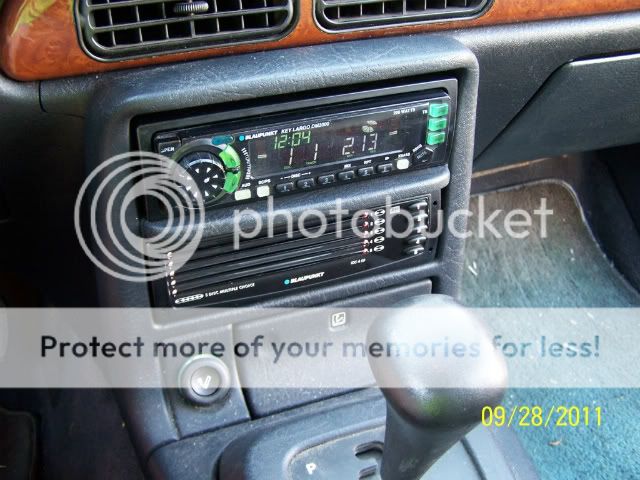
Most recently I have replaced the head unit and amplifier in the Scorpio with something a little more civilized

Image

Image

I have to give a plug to Crutchfield.com here. They actually have a wiring harness for the Scorpio and the XR4Ti. It cost me about $20 delivered and it was well worth it. Not cutting, and a diagram to go with it. Highly recommended!

Both the head unit and the 5 disk in dash changer are Blaupunkt's. I got them both on eBay for a great price. I think they look great in the car and don't look too flashy, but rather sophisticated, like the Scorpio :)

The repair list is getting a little shorter, but does include more:

Replace exhaust, only has one muffler, kinda loud
Needs tires
Needs a paint job
Needs A/C rebuilt / hoses, expansion valve, filter drier, rebuild compressor.
Replace cloth interior with leather out of parts car.
Replace bad leather on driver's side seat.
Replace headliner.
Fix rear hatch window squirter
Repair rear defroster grid (remove tint to get to the grid)
Replace rear speakers
Replace leaky EGR valve
Perform general tuneup / new plug wires / new cap & rotor / new spark plugs
Replace valve cover gaskets
Replace oil sending unit

I am sure I will think of more.
Darren Needham
Andover, Ks.
User avatar
Ray
Level 7
Level 7
Posts: 4338
Joined: Sun Oct 24, 2004 10:40 am
Location: CT, USA

Re: Early 88 Merkur Scorpio Restoration Project

Post by Ray »

Wow, thank you for being so thorough. I am enjoying your project from afar :)
-Ray
1985 Ford F150 - Tow Missile
1985 Merkur XR4Ti -#141 CP "Miss Daisy"
2005 Subaru LGT
http://www.cartct.com
FocusSVT
Level 5
Level 5
Posts: 715
Joined: Tue Aug 08, 2006 12:55 pm
Location: Andover, Ks.

Re: Early 88 Merkur Scorpio Restoration Project

Post by FocusSVT »

Thank you! I wish it was going faster, but all in good time I guess :)
Darren Needham
Andover, Ks.
Camaro5690
Level 5
Level 5
Posts: 568
Joined: Tue Jul 28, 2009 7:40 pm
Location: Leland NC

Re: Early 88 Merkur Scorpio Restoration Project

Post by Camaro5690 »

I really really like that radio setup....looks awesome.
Adam Wilson
User avatar
Bob Weir
Level 7
Level 7
Posts: 1284
Joined: Tue Oct 14, 2003 6:49 pm
Location: Allentown PA

Re: Early 88 Merkur Scorpio Restoration Project

Post by Bob Weir »

Darren,

FYI Front seats are interchangeable. Assuming you have an extra good passenger; remove the entire bottom cushion, seal up the split where the controller was [duct tape inside] and cut new slice for driver's controller. I haven't done a back cushion, but it should be easier.

o2 sensor easy to R&R with "Y" pipe off, especially when you unplug the other end from the harness.

I'm considering upgrading my sound system as well. A few questions regarding yours...
Did you have to do any mods to make the dash and door speakers fit? If so, please explain.
Blauplunk units look great! What are Blauplunk model numbers?
FocusSVT
Level 5
Level 5
Posts: 715
Joined: Tue Aug 08, 2006 12:55 pm
Location: Andover, Ks.

Re: Early 88 Merkur Scorpio Restoration Project

Post by FocusSVT »

Bob Weir wrote:Darren,

I'm considering upgrading my sound system as well. A few questions regarding yours...
Did you have to do any mods to make the dash and door speakers fit? If so, please explain.
Blauplunk units look great! What are Blauplunk model numbers?
I bought a pair of Blaupunkt Velocity 5 1/4 seperates with crossover's and tweeters. When I got the package it only had the woofers in it. After some conversation with the eBay vendor, I kept the woofers. If I had gotten the whole package, it would have been very easy to use the crossover and install the tweeter's in the dash.

No cutting is necessary for the doors or the dash. I did have to drill new holes for the door, the 5 1/4 woofers don't line up with the original ones. I also used the door trim to ensure the woofer was sealed to the door properly.

After removing the dash pad, there are a couple of screws that need to be removed to get the 3 1/2 speakers out. The new ones dropped right in. If I remember correctly, the screw holes lined up.

The 5 disk in dash changer is a Blaupunkt IDC - A09

I found it on eBay. It was new.

Most Blaupunkt head units that advertise that they can control a Blaupunkt CD Changer will work with the IDC - A09

The head unit I got was a Blaupunkt Key Largo DM2000. It was used, but works great.

The reason I went with the in dash changer, was both our Trailblazer and my Focus SVT have 6 disk in dash changers. It is very handy, and the Blaupunkt unit is kinda "flashy" :)

Hope this helps.

The next time I have the dash pad off, I will take some pictures of the speakers.

Have a great day!
Darren Needham
Andover, Ks.
scorpioaddict
Level 5
Level 5
Posts: 553
Joined: Tue Mar 23, 2004 8:36 pm
Location: Virginia
Contact:

Re: Early 88 Merkur Scorpio Restoration Project

Post by scorpioaddict »

The O2 sensor is accessible from directly above, which will let you get a lot more torque on it. Look down though the gap next to the ABS pump.

I used 4" speakers for the doors, because I wanted to reuse the OEM rain shield (ie, a minimum of surgery). I couldn't see any way to use a regular 5-1'4" speaker w/o cutting sheet metal. So I ground off the tabs on the back of the speaker, cut the cone out of the basket, and pulled the old speaker out. Drill holes for the new speaker, and screw it down into the basket. I split some large-ish vacuum hose lengthwise as a gasket for the new speaker.
FocusSVT
Level 5
Level 5
Posts: 715
Joined: Tue Aug 08, 2006 12:55 pm
Location: Andover, Ks.

Re: Early 88 Merkur Scorpio Restoration Project

Post by FocusSVT »

Victory today! I replaced two CV Half Shafts. One in the Focus. One in the Scorpio. The Focus was a redo, ask me about this and I will tell you the story. Anyway it wasn't very hard since this was the third time I have had the front end apart to replace this half shaft. The Scorpio made me a little nervous. With all of the lore about broken bits, bolts, flaming grease, etc. I was hoping the job would go well.

My new best friend: A Pittsburg Tools (Harbor Freight) T-40 Impact Socket. Worked like a charm, no fuse, no muse. No broken bit, no broken bolts. Not too long, not too short. Just right

Image

My weapons of choice:

Image

I used the picks to clean out the bolt head, not pictured is the can of penetrant I used to help clean out the bolt heads. I used the chisel and a hammer to "loosen" up the bolt heads. I then used the 1/2 inch cheater bar and the impact socket and loosened everyone one of those bad boys! I then used the driver and the 3/8-1/2 adapter and backed the bolts the rest of the way out. I didn't break or strip one bolt and I was able to use the one bit for the entire job!

New part

Image

All done!

Image

The procedure I used for getting to the CV Half Shaft was to back the car up on ramps. Loosen the bolts I could get to. Use the floor jack to elevate the one wheel, rotate the wheel until more bolts were exposed, then lower the jack and remove. I repeated this a couple of times.
When I reinstalled I had the great Alan Socket head bolts I purchased from MC2racing.com and once I got some started by hand, I used the jack to elevate the tire and installed all of the bolts then, using a long handled Alan wrench to tighten them all up.

I feel very fortunate that this job went as smooth as it did
Incidentally since this job didn't take a couple of days, I was able to fix the small antifreeze leak I had coming from a loose heater valve hose. It has been a good day!

Image
Darren Needham
Andover, Ks.
FocusSVT
Level 5
Level 5
Posts: 715
Joined: Tue Aug 08, 2006 12:55 pm
Location: Andover, Ks.

Re: Early 88 Merkur Scorpio Restoration Project

Post by FocusSVT »

I haven't done anything fun on the Scorpio in awhile. Lots of maintenance, no upgrades as of late.

List of things done recently:

Replaced IAC
Replaced Valve Cover Gaskets
Drained and filled transmission with a new filter.
Side note, when I did the fluid and filter this time I did not use the gasket that came with the kit. Instead I used Ultra Black RTV and ran a bead of it around the pan. I then bolted up the pan. No drips, no leaks. I got this from a friend who owned a transmission shop back in Chicago. He always told me this was the best way to ensure no leaks. Definitely works on the A4LD!

I am currently tracing down an intermittent driveability problem with the car. Unfortunately I have been "throwing parts" at the problem, but haven't fixed it yet.

Description: It all started about 6 weeks ago. Driving on an interstate at 65 mph, I could feel a "dead" spot in the power band right at 2100 rpms. Above or below it went away, but it was definetely there. This had not been present until now.

I pulled codes, got nothing. On the next cold morning I checked the resistance of the ECT sensor. It was only a year old, but it was showing a very high resistance for the temperature. I replaced the sensor thinking that would be the end of the problem. The dead spot went away, but then I had a bigger problem. The car would randomly die while driving it. Again, no codes, but it acted like it was flooded out. The only way to get the car to start was to push the pedal to the floor, and let the engine fire without adding any more gas, the car would finally catch, and then start.
Needless to say, gas mileage went down. I check the TFI, also examined the PIP sensor on the distributor. It seemed okay, but after doing research, it appeared this could lead to the issues I was having. The PIP sensor was only $20 or just under, so I bought one, and installed it. Not a fun job taking the distributor apart. The roll pin is a pain to get out and reinstall. Luckily my father in law helped me out. This did not solve the problem. Ran codes again and this time I got a code saying the mixture was always lean. The O2 sensor is a couple of years old, but it was a cheapy from Ebay. I ordered a new one from rockauto.com. I got a KEM parts one with the OEM connector on it. Installing an O2 sensor on a Scorpio is a pain in the but. I had to drop the y-pipe to get it off. When I reinstalled the y-pipe I had a stud break off when I was tighting up a nut. CRAP! I ended up taking the passenger side exhaust manifold off to get the broken stud out, and get a new one installed.

This is now about 4 weeks of time.

I did the valve cover gaskets at this time. I reinstalled everything this past Sunday. Ran the codes, all 11's, so took the car for a drive. Ran fine.

Drove it to work yesterday, it died once when I came to a stop, and tried to die again when I turned into work. Got home last night and ran codes again. This time it had a code in memory, 51, stating the ECT sensor was out of range. It wasn't a hard code, just a stored code. I checked the ECT connecter, reset codes, and ran the check again. No codes this time. Car was still running off, it would idle up and down, and wasn't very smooth. I took a vacuum hose off by the vacuum switch sensor for the transmission. There was transmission fluid in the vacuum hose. CRAP, the vacuum modulator was only two years old. Got a new one and replaced it along with the fluid and filter for the transmission. What a pain. Put it all back together and took it for a drive yesterday. Shifted a little softer, but other than that ran fine.

Today the car died when I pulled into Mcdonalds. WHAT THE HECK! Again, acted like it was flooded. Got it running and went to work. Go home tonight and pulled the codes. Got a hard code of 34, again with the ECT. I checked the reading of the ECT and it was within specs, checked the circuit itself, measure no resistance on the ground portion of the circuit, and measure 5 volts on the other wire.
As a back story, I also changed the IAC sometime during this mess, and I have verified the throttle position sensor is working correctly.
I also found a vacuum leak going to the vacuum modulator on the transmission. One end of the soft hose had enlarged and cracked.
I back probed the ECT connector and measured both the ground and the hot wire and got the desire results. I think there is a bad connection still in the connector. Otherwise it must be in the harness, which I really hope it is not :(
I had to drive it to the store this eveing and it ran fine. Stopped by Oreilly's and picked up a spare ECT just in case. Go home tonight and ran the codes again. All 11's. I am going to check it again in the morning. What a pain.
Sorry, no pictures this time. Will update soon.
Darren Needham
Andover, Ks.
FocusSVT
Level 5
Level 5
Posts: 715
Joined: Tue Aug 08, 2006 12:55 pm
Location: Andover, Ks.

EATC Blend Door Actuator Lubrication

Post by FocusSVT »

I was too tired to continue, but I did have one more update.

I have had an annoying problem with the EATC blend door actuator. Each time it would move, it would make a loud howling sound. The first time I heard it, I thought it was the blower motor. I had just replaced the blower motor last fall,so I was very upset. After I realized it wasn't the blower motor, I narrowed it down to the actuator.

Last night while I was waiting for the engine to cool down so I could diagnose the phantom code 51 issues I am having I decided to tackle the blend door issue. I had a junk door that wouldn't move at all, so I decided to take it apart first to see what could be lubricated. It comes apart fairly easy. I recommend marking orientation of the various plastic gears. There is a location sensor on one of the gears and if it gets messed up, I am sure the motor will destroy the mechinism.

Image

I took this one totally apart. The motor itself has a double stack of gears all meshed together to provide the drive mechanism for the acutator. Way over designed as far as I could tell. In my case what I ended up doing, was remove the back plate of the actuator to expose the rear of the motor. The end of the commutator is exposed and I used some 3 in 1 oil and put a drop on it. The motor quieted down instantly.

Image

Not sure how long it will last, but I hope it fixes it for awhile :)
Darren Needham
Andover, Ks.
User avatar
Bob Weir
Level 7
Level 7
Posts: 1284
Joined: Tue Oct 14, 2003 6:49 pm
Location: Allentown PA

Re: Early 88 Merkur Scorpio Restoration Project

Post by Bob Weir »

Hi Darren,

Dies unexpectedly;
I didn't notice any mention of the COIL. I had similar situation "dies when hot" and with fuzzy logic feel it was the coil due to engine compartment heat affecting a marginal coil.

Checking codes;
You mentioned letting it cool down before checking codes. It's my understanding, codes should be checked with eng at normal operating temp.

ABS Light;
It's my understanding, disconnecting the battery clears all computer codes and resets them to default. I did this after replacing the accumulator and now don't get the random brake idiot light show.

Computer for engine management;
I've swapped 88 - 89 without any problems. Ford Tech Service Bulletin suggests using newer computer [with "improved" software] to cure some eng issues. And by the suggested part numbers, it appears it's the same item, only a newer version.

Bob
Post Reply