'88 XR Project AutoX junk

Documenting your big project with photos/videos? Have photos/videos to share of anything Merkur related? Place your links to photos and videos here. Please - Merkurs and Merkur-related pictures only. Cosworths welcome!!
Carlisle and event related pictures are to be placed in the relevant section under 'Events'.
Post Reply
Merkur Club web site
User avatar
RoninWolf
Level 1
Level 1
Posts: 67
Joined: Sun Dec 28, 2014 9:02 am
Location: Big Rapids, MI

'88 XR Project AutoX junk

Post by RoninWolf »

Original Posted::Sun May 24, 2015 1:10 am

This is a story, so if you want to skip to the details there will be a
'*/' on the left and at the end of the info '/*'.

Got the car this past X-mas, my first Merk. It was a 20 minute drive from my house so I figured it was worth a look. */Inspected the car only to find 2 rusty areas less than the size of a quarter, THAT WAS IT. For a 20+year car in Michigan to be this good is unheard of. Owner was very straight forward and if he ever wants to drive it the seat is always open. :D
/*

Interior was poor but 1"+ receipts/history, 3" exhaust from front to back, aftermarket intercooler, battery relocation, a fine piece. */Only issues were battery draining and the #3 cylinder was starting to go, so a rebuild was due within a year or two/*. Bought the car, had to bump start it and drove it home. I'm use to driving my 80s N/A Escort GT, this my first turbo and I was ecstatic and afraid all the way home. Set the throttle to 55mph location, turbo kicks in and your doing 80+, what a rush. Parked it till summer when I could work on it for more then 5 minutes and still feel my hands.
Image

Summer arrived and i had access to garage space again, time to give it a check up. Car wouldn't start without jumper cables and wouldn't stay on for long at idle afterwards. Day later find the starter went bad over the battery [literally cracked open]. Electric locks were draining the battery, headlight connectors are picky, horns rebuilt and hazard switch disintegrated. Got a replacement dash, as well as other mint interior bits [was black, replacing with grey]and another set of XR wheels [needed a winter set]. Will probably sell/trade front seats for racing buckets. Also, 15" turbines for autocross later on and Euro headlights to follow.
Image

Onto the engine. Left car over cardboard to look for leaks. Some light coolant leaks and some oil dripping from the clutch cover. */Starting compression test on #4 and stopped before doing #2, coolant in the cylinder pretty much meant an engine pull with the rear oil seal going. After measuring, .010 overbore was needed and prepped everything except cylinder head for inspection. General inspection showed #2 & #3 valve seats had cracked through to the water jacket :evil: Engine is scrap. /*
Image

Most of my part money is tied up in my winter project, so just getting the car running again is the priority till it gets sold. Was hoping to have car ready for June 13th autoX event [shakedown/acquainted run]. First XR and it is off to a rough start.
User avatar
RoninWolf
Level 1
Level 1
Posts: 67
Joined: Sun Dec 28, 2014 9:02 am
Location: Big Rapids, MI

Re: '88 XR Project AutoX junk

Post by RoninWolf »

Original Posted:: Mon May 25, 2015 7:58 am

Drove to Detroit area to meetup for my replacement engine, bought Tim Bevans engine. Going to strip it down, hopefully today, inspect everything and go from there.

Original Posted:: Sun May 31, 2015 10:56 pm

Hope to have the engine ready to go in on Wednesday [will post pics later on]. What I have found/done so far::
Came with::
0.020 Over Speed-Pro D-port pistons
Custom roller cam [bo-port]
Oversized valve job
Boport Stage 3 head
Boport 1.1 Cam
Adj cam sprocket
12-point reusable studs
Aftermarket water pump [shrouded fins]
180 thermostat

Image

Found:
Copper glitter in water jacket area [stop seal additive and/or non distilled water use]
Some gunk in the #4 crank journal with what looks to be oil starvation from #3 on back.
#4 Rod bearing sheared & pitted like a dirt road [probably oil starved/due to fire]
#1 Rod bearing was mint and got progressively worse toward #4

Done/process of::
Clean everything and paint rust prone parts [oil pan has been it, so far]
Fresh gaskets all around [not taking chances with the fire]
Rake oil lines for any clogs
Flush as much stop leak out of water jacket
Lightly polish any junk off crank [no damage found]
Fresh rod and crank bearings
Use 192 thermostat from other engine

Things left/might not do::
Remove pistons [clearance inspection]
Oil pump cleaning/inspection
Remove broke bolt from exhaust turbo side

Was looking at making this car a daily/autoX SP class. Pretty sure the race valves and cam are prohibited, but then again I don't have the paperwork/receipts to show for it :lol:

Personal Tricks/Tips::
-Shouldn't have to remove pistons to check clearance, just the crank. You can shift the piston while the rings hold it in place. By using feeler gauges, you can shift the piston to one side [measurement #1] then shift to the other [measurement #2]. Subtract one from the other.
-Reuse gaskets, I don't dare do this on water gaskets, just simple oil ones [front crank seal and auxilary seal]. Put some sealer on one side to hold gasket in place [probably block side due to being a shared gasket]. Put a thin film of anti-seize on the part gasket surface. This worked great on motorcycle gaskets for maintenance [clutch and stator cover].
User avatar
RoninWolf
Level 1
Level 1
Posts: 67
Joined: Sun Dec 28, 2014 9:02 am
Location: Big Rapids, MI

Re: '88 XR Project AutoX junk

Post by RoninWolf »

Original Posted:: Sun Jun 28, 2015 11:12 pm

Idle valve wires need to be redone but it runs. Tappets seem a little noisy to me, but that may just be how it runs with the race valvetrain. Still need to get all the leaks out of intake hoses and calibrate wastegate.
https://youtu.be/_Ryw8HH7cOA
Wiring in a replacement hazard switch into the vacant cruise switch spot. Tried working it into a stock housing but the switches flip in a different direction and didn't want to spend a week thinking/fabricating. Few more essential lights to fix and then i can finish up the interior.

Original Posted:: Mon Aug 17, 2015 12:45 pm

Sadly, didn't make Road America. Had some bad brake chatter from passenger drum. Distributor pickup was shot and only worked in ~20min intervals on the highway. Fixed the brakes and replacement arrived just in time. Aug 14-16 at Grattan had continuation of vintage racing, hour drive away.
Headed down and fuel line decided to freestyle under the hood :shock: Luckily no fire happened and it was fixed. One of the turbo studs broke and the gasket went with it, best luck i have had with a highway test yet.
Got to tour it on track though, no pictures that i know of :cry:

Test,fix, repeat
User avatar
RoninWolf
Level 1
Level 1
Posts: 67
Joined: Sun Dec 28, 2014 9:02 am
Location: Big Rapids, MI

Re: '88 XR Project AutoX junk

Post by RoninWolf »

Original Posted:: Mon Sep 21, 2015 3:39 pm

Euroglass install, comparison, maintenance
http://forum.merkurclub.com/forum/viewt ... 30&t=32490
User avatar
RoninWolf
Level 1
Level 1
Posts: 67
Joined: Sun Dec 28, 2014 9:02 am
Location: Big Rapids, MI

Re: '88 XR Project AutoX junk

Post by RoninWolf »

Original Posted:: Sun Sep 27, 2015 9:05 pm

Misfire at 4k+ is becoming an issue to troubleshoot. Revs happy standing still, under boost not so much. This only started after i had to replace one of the manifold/turbo studs.
Ran car without hood to test if exhaust leak in a closed bay was the problem, it was worse without one it seemed.

Diagnosis/Repairs thus far::
Resurfaced E9 manifold.
Spark plugs looked normal, proper soot color, not broken, tested.
A spark plug boot was falling apart, replaced wires.
Exhaust leak at elbow/downpipe flange, still leaks.
Compression Test [Front-Back]::130-128-128-138 [104-138psi pass]
Intake/intercooler tubes leak tested. [15-20psi pass]
Fuel Pressure at idle:: 38psi [35psi+ pass]
Fuel Volume test:: ~10oz at 8sec [7.5oz+ at 10sec pass]
Fuel Pressure hold:: 22psi [30psi+ fail]
-Pressure Regulator holds vacuum at -18psi
Added fuel injector cleaner.
TDC static timing checked
Kinetic timing is good [plug was removed during check]

After a week of trial and testing, I pulled the Oxygen Senor after a quick run down the block and back. Smelled of radiator fluid :(
Boost has creeped from 17psi after engine rebuild down to 14psi with the "misfire" issue showing up.
Had to pull the turbo twice already, guess one more won't hurt :P

Turn/Hazard switch Mod

Mine was gone when I got the car, so I started looking for alternatives other then buying a new one.
This is what you have in the XR:

Image

After looking around I came across a Mercedes W124 hazard switch, get connector with switch if possible, these can be bought for under $15:
Image

Chose to place it next to the rear wiper switch. I tried to work the switch into an XR heated seat switch. With the switch flipping in the opposite direction it would take a lot more work with tools i don't have.

Remove Bk/R and R wire from the terminal, DONT CUT THEM. Take the connector apart and physically remove the bullet connectors.
All other wires will have to be made to length and spliced into the turn signal wires. Illumination of the switch must splice into Gy/GR wire, ground to steering column support right behind instrument cluster.

6x different lengths of wire,different color if you can help [16 gauge is bigger then what the stock switches run]
6x16-14 gauge bullet connectors
8x1" segment Shrink tubing [if no connector was aquired]
5x22-18 gauge Quick splice, depends on wires your using/adding [can solder and wrap otherwise]

Test fit the bullet connectors, they should take a little force to slide on. Add the shrink wrap over the connected bullet connectors, if you don't have the Mercedes connector. This will prevent shorting if one of the plugs do come loose. Labeling the wires is always a plus.

With the delete switch cover, trim the switch housing to fit inbetween the security brackets. Make sure the switch works within the cover.
You can glue the housing into the cover or you can use wax dental floss to weave the switch onto the cover between the slots on the security tabs. Double knot at every run to opposing tab. 2 feet of floss should do.

If unclear, I can add pictures upon request.

http://forum.merkurclub.com/forum/viewt ... 27&t=29926
User avatar
RoninWolf
Level 1
Level 1
Posts: 67
Joined: Sun Dec 28, 2014 9:02 am
Location: Big Rapids, MI

Re: '88 XR Project AutoX junk

Post by RoninWolf »

Original Posted:: Sat Oct 03, 2015 6:21 pm

Car is out of commission until I can get the "misfire"/coolant leak fixed. Trying to address other issues in the meantime.
Headlight intensity sometimes fluctuates on the road, probably due to the way the lights get power or even a ground problem.

Oct 11--After reading this thread [http://forum.merkurclub.com/forum/viewt ... olant+leak], pulled cylinder head and cleaned it up a bit to inspect surface. Out 4 thou in some spots, block looks to be the same. Guess the fire it was in through it out of spec. Thousand mile engine rebuild (╯°□°)╯︵ ┻━┻
Would have done this earlier but didn't have a precision straight edge at the time. Probably will inspect the cylinders while I'm at it, again :evil: Least I can fix my leaky oil pan.

Headlight Wiring Upgrade [Work In Progress]

This is done with the Euro headlight install, but can be done with stock lights minus a relay and a few wires.
I am looking to possibly make a kit that will be, relatively, hassle free to install. Only issue I have come across is a hole will have to be drilled into the fuse panel. A screwdriver and a couple of wrenches would otherwise be all that's needed. The kit will be reversible, minus a plug for the hole.

Image
Image

Original Posted:: Thu Oct 29, 2015 10:26 pm

This is p*&%$@! me off, both surfaces are fine by machinist, probably was a piece of sand on my edge or something.
Bought a replacement set of HLAs and a Stinger Oil Return line. Return line won't mount up, quarter inch too long and I cant get the angle fitting to go any farther into the block even though there's more threads. Should have test fitted when the engine was still on the stand.

Original Posted:: Sun Nov 15, 2015 6:58 pm

FINALLY, the 'misfire' issue was the water seals going in the turbo :haha Deleted the water line for now, will most likely rebuild turbo come summer. Still can't get the oil pan to seal, leaks right off the front cover even after I straightened the pan surface.

Car has been fighting against going to every event since mid-July. Finally, got the car to an autocross :D
Image

Night before I had to track down the only timing belt north of Grand Rapids, diagnose a lack of ignition and do a shake down run. Only to wake up the day of to find my headlights didn't work :twisted:
Come to find out, the upgraded grounds I gave to the lights melted the main light switch.

Got around to my relay headlight kit, since I had to rebuild the switch. Going to wire/solder under the dash so I don't disrupt the fuse box seal. Rubber grommet is a little troublesome to insert but, I can make a kit for anyone interested [OEM or Euro].
Main Light/Wiper Switch Internals
Image

Internal Switch Socket
Image

Rebuildable/Modded Switch
Image

Image


Original Posted:: Wed Nov 18, 2015 6:55 pm

After searching on and off for months in my area, I found the antenna adapter for the Integrated Antenna, or the Isolator Assembly, in the hatch. Metra 40-vw17 adapter cable with a 144" extension cable (Metra 44-EC144). With SvoSierra help and suggestions, I ran the cord along or behind the passenger pillar paneling or weatherstripping. Used some junk electrical loom to hang the cord off the hatches window seal so the cord won't break, like in the OEM location. With this layout, there is still about a foot of cord left.
User avatar
RoninWolf
Level 1
Level 1
Posts: 67
Joined: Sun Dec 28, 2014 9:02 am
Location: Big Rapids, MI

Re: '88 XR Project AutoX junk

Post by RoninWolf »

Original Posted:: Sun Nov 22, 2015 12:54 am

With snow starting to settle in, I started tearing into my original XR seats with the black duct tape covers. I was going to toss them anyways and I wanted to experiment with a foamectomy so I can get more side support and sit in the car with a helmet without hitting the headliner while maintaining the stock seats.
The mounting frame is a good chunk of weight of the seat. Started with the bottom, the foam is still in great shape. The frame looks like it was made to give more side support. Just sitting in the bare frame, I can tell there's some potential.
Seat Cushion
Image

Bottom Frame
Image

Original Posted:: Wed Nov 25, 2015 7:21 pm

Merk Foamectomy
http://forum.merkurclub.com/forum/viewt ... 30&t=32492

Original Posted:: Fri Nov 27, 2015 4:51 pm

Any interest on this thread, or suggestions for that matter, would be appreciated. Would have probably put off the foamectomy otherwise.

Cup Holder Upgrade [Work in Progress]
Was looking at a cheaper way to get cup holders without paying $100+ for the arm rest one.
Universal DIN / Cup Holder Storage Case, ~$10. Won't be using the amplifier slot for anything and the mock up shows it won't interfere with shifting.
Image

Original Posted:: Wed Dec 16, 2015 5:48 pm
The Taurus & universal din, the one i bought above, "as-is" interfere in the amp slot. Considered putting it in the ashtray spot but cup holder won't work in that location. You have to sacrifice the back half of the coin slot, or top slot, to get it level. Also, to get it to clear the upper lip of the slot/dash it has to stick out as far. Trying to see if I can get more reach out of it and make a cage setup to make it work. Rather hack up a common $10 one than the somewhat scarce Taurus din, costing three times more. A universal vent mounted cup holder would be easier, but I see it as more of an eyesore.

Original Posted:: Tue Feb 02, 2016 3:55 am
A great alternative for a cup holder would be the VW Lupo, with the half depth storage on top. However they cost in the $150 range and that's before shipping from Europe. Anyways, progress is on hiatus for a bit.

Got the car up on the lift, before New Years, to get a better look of the underbody farther then an inch from my face =P
Some light rusting at the visible seems, but looks amazing for its age. Sorry, didn't have a good camera at the time. Transmission looks to be a little leaky at the tail housing gasket. Going to try and get that repaired over winter, along with torsen install and hopefully turbo rebuild. Really was hoping to have money to buy tires to get in a good autoX season this year, but at least I am making progress to get there eventually.

Pulled diff after i fixed the tension on the e-brake to lock the driveshaft in place. Hope I can get an upgraded diff mount before i put this back in. Most of the right side of the pumpkin was caked in sludge and oil. Had to grind off the ID tag torx and right side lash torx. Got lucky extracting them both. Hate those bolts :evil:
Image
User avatar
RoninWolf
Level 1
Level 1
Posts: 67
Joined: Sun Dec 28, 2014 9:02 am
Location: Big Rapids, MI

Re: '88 XR Project AutoX junk

Post by RoninWolf »

Original Posted:: Sun Mar 20, 2016 3:46 pm

MC2 Torsen Kit Install
http://forum.merkurclub.com/forum/viewt ... 30&t=32493

Original Posted:: Mon Apr 18, 2016 8:14 pm

*/
Took all that time rereading the rear axle procedure and differential install I overlooked something that set me back two days, jack points. Installed a MC2 diff mount while I was here only to have the mount be 1/4" behind the holes on the body. I had put the stands on the crossmember, which caused the suspension to flex to the point where nothing would line up. Thanks to Grayson, yet again, for helping me on this oversight.
/*
Took it for a quick drive to feel out the driveshaft and feel for anything noticeable, all seemed fine. Has excellent traction where it use to struggle for grip, very predictable feel throttling through corners. Suspension is still 'floaty' feeling and lacking tire grip.

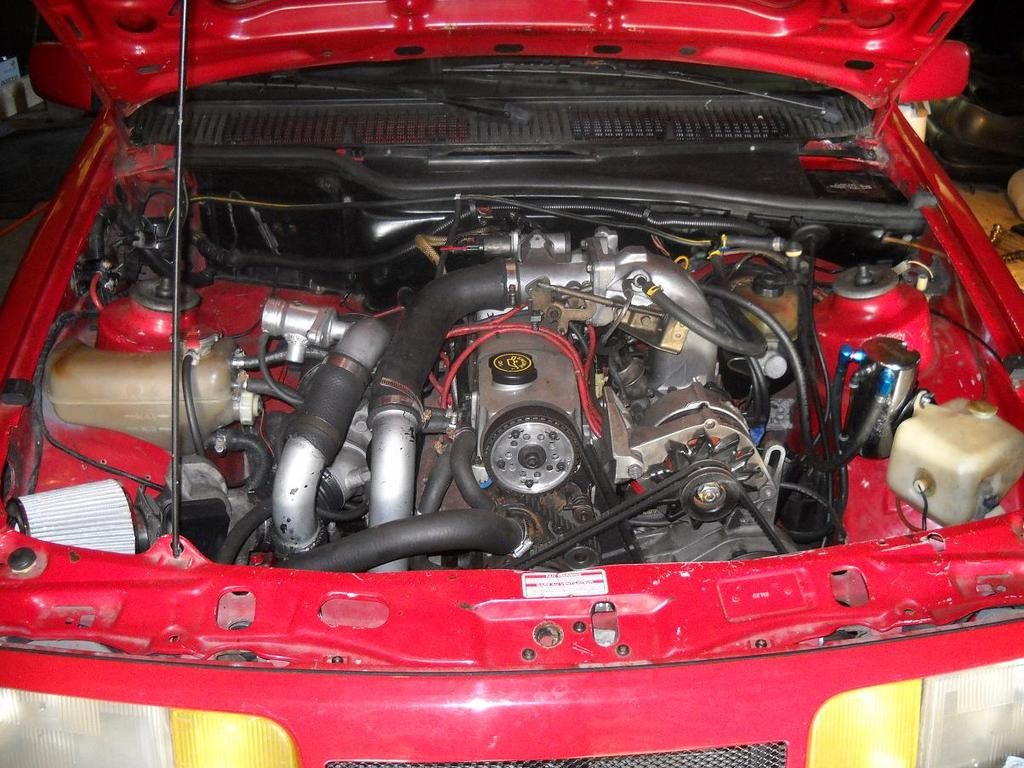
Now onto the turbo. If you've been reading, there have been noticeable things around or about the turbo since I got the car.
1) Brown oil film lined the inside of the manifold all the way to the compressor.
2) Compressor wheel has some sheared edging.
3) The 'misfire' issue went away after deleting the coolant lines to the turbo.

------------------------------------
Turbo Wheel Condition Information

Wasn't too sure on the compessor condition. Read a few write ups online and even a few books on turbos, nothing really describes wheel condition like the spark plug condition charts. Few people in my area that have worked on them before didn't really give me a straight answer either. I ended up buying a replacement, however light fin damage can be lathed off and salvaged much like brake rotors/drums.
-------------------------------------

Since the compressor is being addressed, a balancing will be needed. Even if it isn't necessary, completely rebuilding with upgraded 360 thrust bearing. G-Pop is an excellent store that even sends instructions on general assembly process.

*/
Most everything you see on here is self taught, book reading and/or internet research/help and I'm doing it first time here. All the knowledge doesn't matter if you don't have the experience to back it up, or the initiative to try without it.
/*

Stripped turbo down and inspected. Couldn't afford a $200+ 3-point ID micrometer, got it measured at turbo shop.
http://www.d-series.org/forums/diy-foru ... tures.html

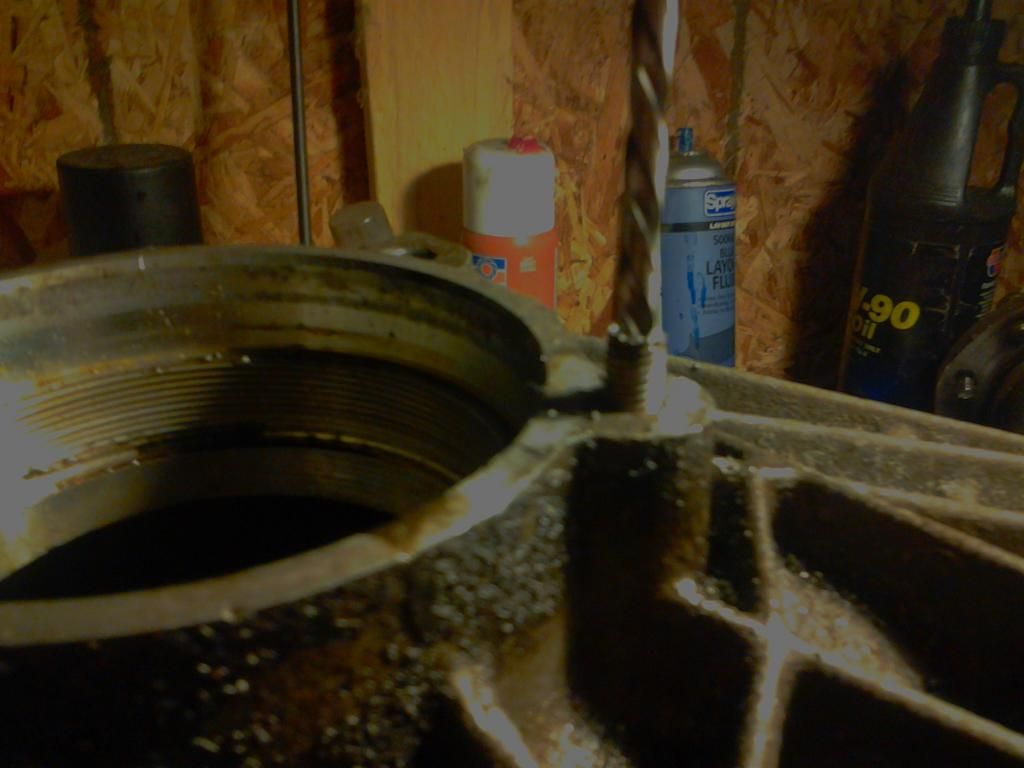
Taking the turbine housing off took more then "lightly tap" procedure with heat. Make sure you have an oxy-acytelyne torch when you do this, most likely it's the first time it's been apart since it left the factory. Not sure how you get this in a vice. Pinching the turbo between two tables is much easier. Had to heat the joint area to the point where it was probably as hot running on the car, bracket edges glew to the brink of melting it seemed. Barely handle the thing even with gloves. With a rubber hammer, whaled on an edge a couple of blows and checked the turbine for rubbing on the housing to reposition my blows, with repeat of torching. Will assemble with anti-seize film on this lip for easier future removal.

Shaft OD Exh 0.3998
Bearing ID Exh 0.4008 =0.0009" Clearance
Shaft OD Int 0.3998
Bearing ID Int 0.4001 =0.0012"

Housing ID Exh 0.6220
Bearing OD Exh 0.6184 =0.0016"
Housing ID Int 0.6220
Bearing OD Int 0.6185 =0.0015"

Everything is within spec and is visibly good so I could have gotten by on just a $20 balancing, wheel edge cleaning, and basic gasket kit. The shaft-bearing clearance has a 0.0015" service limt, so some possible concern on Int side.

Assembly is really simple, hardest thing is setting the compression oil seal ring and bolt torques. Loosely installed compressor housing on. Turbine housing bolts line up with water taps, however the turbine mounting surface is at a right angle with the oil feed line surface. I use the OEM actuator so a mock up of the attachment on the compressor housing was necessary for fit. After installing back on the car, I started the engine without running to get the oil to the turbo before a proper start.

On a side note, got replacement front fender flares that didn't come on car. Can't install due to fenders being rolled by a previous owner.

Original Posted:: Fri Apr 29, 2016 9:42 pm

Car was spitting 3+ quarts after some full boost sprints. Wish the oil light would have worked, not sure how bad the bearings got in the engine and the turbo are now. From people with more experience than me, the PCV valve needed to be replaced. Rather then replace it, I just spent a few hours at the hardware store and made a replacement. Actually hear it build boost in neutral now.
Image

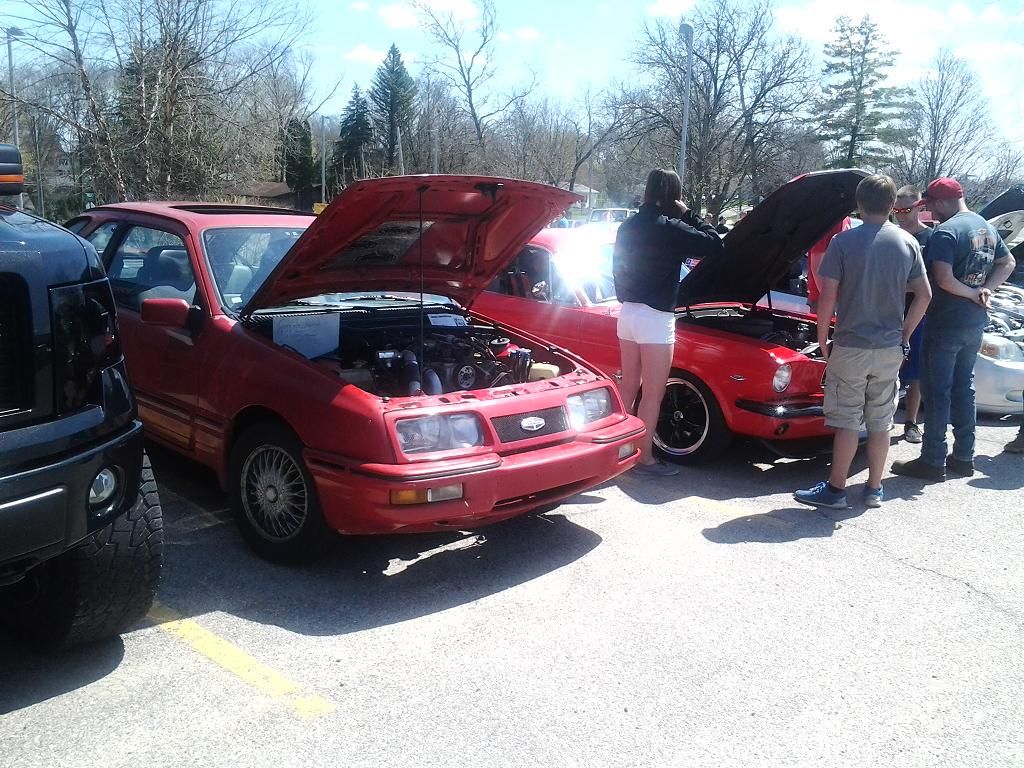
Got the car to a car show this past weekend. Some general interest in what the car was. Ended up having to fill the empty coolant overfill bottle before leaving. Car stalled on startup/idle while leaving and tach seemed to only register half what the engine rpm was. Have yet to find out why it had such problems. Spark plugs, compression test, and visual inspections showed no symptoms.

Image

Again from more experienced people, the piston rings are not sealing that well. Some blue smoke on overrun [aka::coming off boost] A very annoying thing seeing as, from what I've read on here, it was rebuilt with less than 200mi before I got it, and I rebuilt it to inspect for fire damage. This is why I did a visual inspection, cleaning, and didn't see the point in replace them. There's also a new noise, to me, that comes and goes form the turbo. Really hope I don't have to fix/repair everything again, really want to move onto suspension/tire upgrades.

Original Posted:: Wed Jun 22, 2016 7:58 pm

merkurdriver wrote:
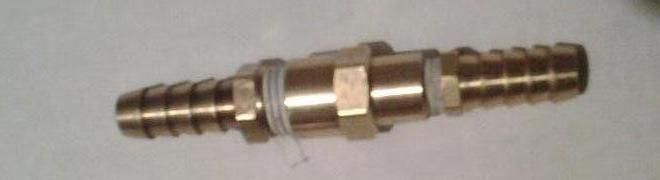
What's inside that "PCV valve hardware store parts replacement" ?

I like to test my DIY stuff before posting something, good thing too since the O-ring didn't seal properly after a week and a half. All it has is a ball bearing and the O-ring sealed in place with sealant, with the three brass items visibly seen with plumbers tape. Just need to modify the larger 3/8" barb so air can get around the ball.

Anyways, replaced PCV with Motorcraft to eliminate it as a problem. Thought the oil catch can was spitting oil so I grocery bagged it before driving to see. Looks like the oil is coming from the dip stick. Car didn't have the plenum support bracket for the stick, but with the amount of oil spray I think it's more likely to be a head gasket issue.

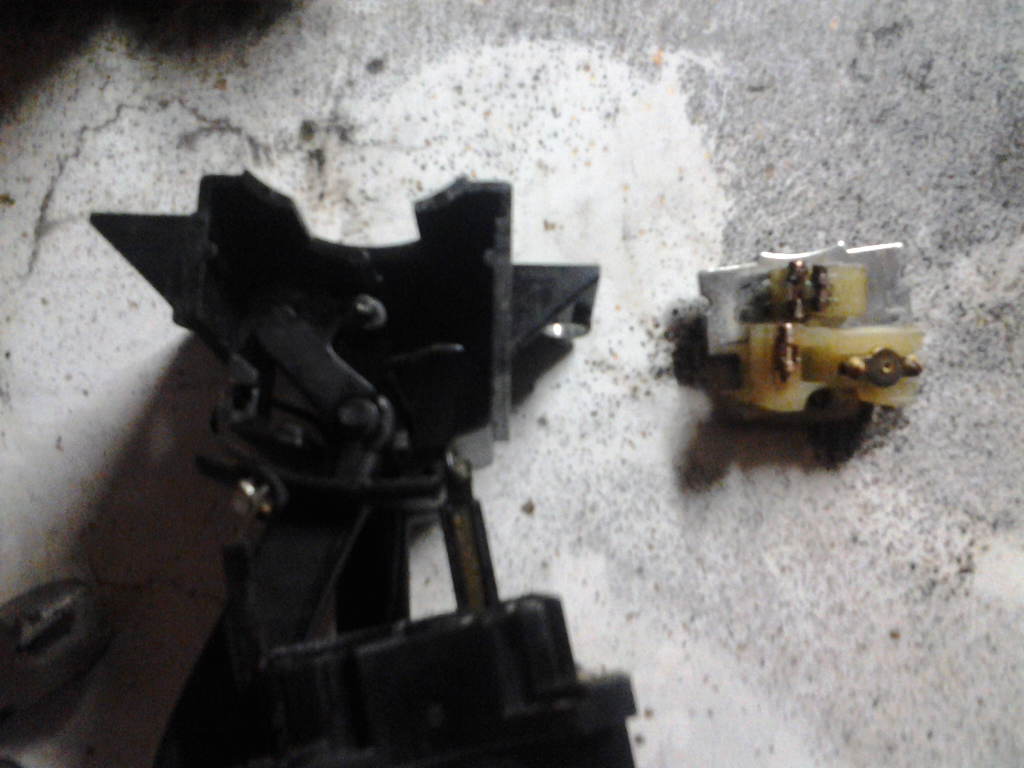
Another problem, after sitting for a day the car does not want to idle right after starting. Have to throttle the car just to stop it from dying, after a minute it goes away. Getting worse. Also, tach has also comes and goes every once in a while, only reading a max 1100 rpm. Both issues might be caused by a TFI starting to fail, I need to find my spare to see.

Original Posted:: Tue Aug 09, 2016 1:54 pm

Found out a few weeks ago that the PCV valve needs to be mounted vertically to function right. Main reason I hate getting projects with someone elses work :evil: Only good thing is no more serious oil loss problem now :D

The turbo has started to 'hum', I can only assume the engine bearings are in just as bad of shape. Will rebuild the turbo, for now, in hopes of taking it to Grattan Raceway VSCDA event for some Touring.

Original Posted:: Mon Aug 22, 2016 9:50 pm

As seen by the picture, the turbo bearings were charcoal [Left to Right: Replacement, Compressor, Turbine].

Image

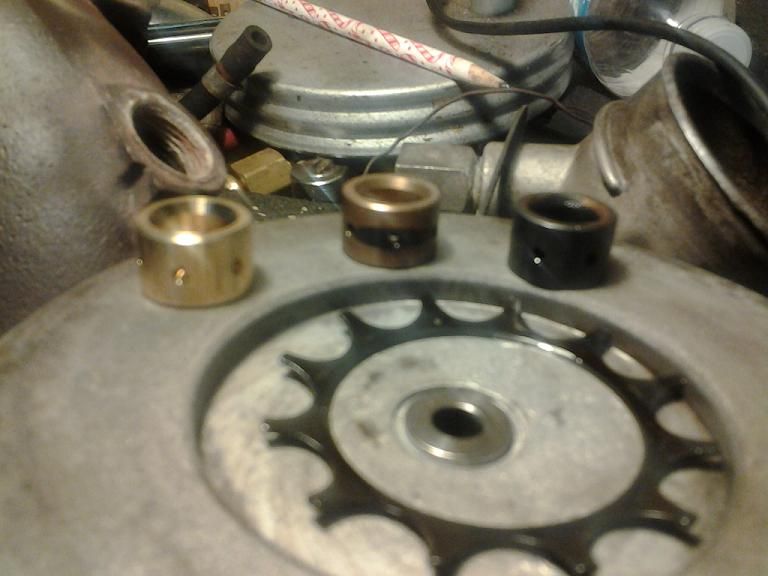
Surprisingly, the bores were not worn from original measurements =D
There's a rattling tin sound coming from around the turbo, like the turbo gasket hasn't seated properly. Will try to track it down.

Corner worked and toured at Grattan to feel out the car. Really enjoyed bringing the car to the event. Most everyone knows the car, and some even watched Hurst.

Light rain Saturday made the track a little oily, and with my lack of track experience, back end kicked out and put me in the ditch =P Managed to drive the car, properly, around the track Sunday. Tires are pretty much maxed out on grip and brake fade really started to show around the third lap. Pedal feel is a little spongy well afterwards, but I might just now be noticing it. Front lower control arm balls are a little loose just cruising around, can really notice under braking off the track straight.

Oil problem seems to have been fixed, however the dip stick still seems to be blowing off the tube. Also, throttling through the gears I can smell oil but never find any under the hood or smokey exhaust. Compression test didn't show any problems.

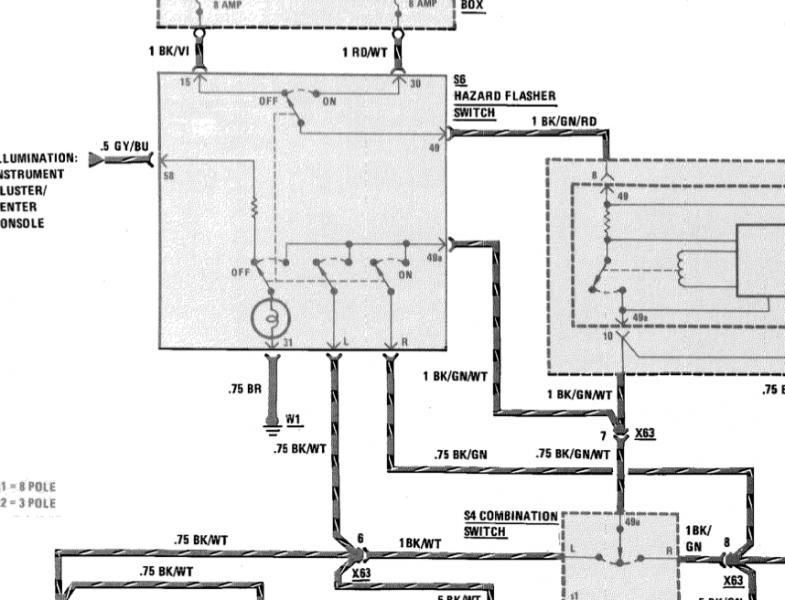
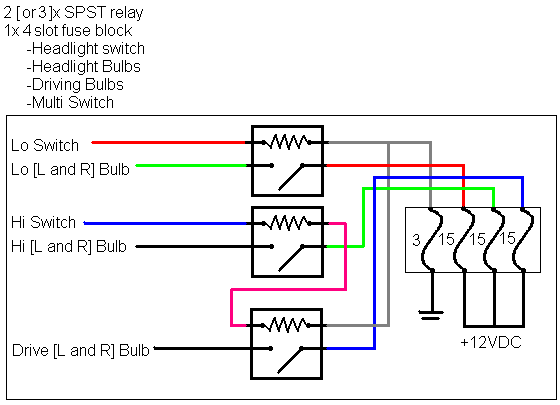
Upgrade/Mod list is still shaky, as well as getting a winter car. Really need to save for a T5 swap to finish mechanical/engine upgrades before getting into suspension, tires, and brakes. Electrical work is another issue to be addressed for future upgrades/swaps.

Original Posted:: Wed Aug 31, 2016 3:52 pm

Rattling at the turbo was the wastegate actuator linkage slightly over extended.

Going junkyard shopping. Bought a pair of '99 Mustang PBRs and rear Escape bracket adapters. The performance shelf is growing :) Honestly considering buying the '99 brake master cylinder [1-1/16" bore] to try and put on the XR booster, looks like no adapter plate would be needed. Only thing I see as an issue is it's a little longer and the reservoir that comes with it will have to be used. Tapping the bleeder for a coupler will allow stock lines, for the most part, to be used.

Another design concept I'm working on is a full wishbone conversion, 70s mustang front and Cobra IRS rear layout. A lot of complications come up for the front, as well as the rear. There has been two ways that have been done for the front, goober in a mustang crossbrace or chop off the front and go tube frame. I am looking at another option, keeping lower control arm layout, swap to mustang ii knuckle and add upper arm, shock, and spring. Reinforce inner structure of body to support arm. This will leave the possibility to go back to OE. Sadly, my knowledge on the suspension mathematics has perished over the years. Hoping to pick it back up to see if the dynamics checks out before moving on. I don't have a CAD machine, nor a person to help me, so everything will be done old school, pencil, paper and a K-nex set =P
For the rear, I noticed the thread on here for the IRS swap. They have been too busy to make progress on the conversion. Another pioneering mission after the front.

I have a lot of ideas and controversial designs for this car. Money will always be a factor, so buying parts here and there will probably be the only progress this project sees.
User avatar
RoninWolf
Level 1
Level 1
Posts: 67
Joined: Sun Dec 28, 2014 9:02 am
Location: Big Rapids, MI

Re: '88 XR Project AutoX junk

Post by RoninWolf »

Finally coming back to this thread after...wow...been a while :roll:

I guess I can highlight the build thus far, starting from the rear.

-Currently in the process of repairing late model rear hatch. Due to the ~20 lbm spoiler, and no structural support in the middle, the center buckles under "lazy" hatch closing over time. Also, deleted third brake light location, and painted to match the early two-tone, red on gray look.

-Gas tank POR-15, with fuel pump door cut into floor, 255 walbro.

-Torsen Diff

-Escape rear caliper upgrade, with stainless braided lines, I believe it was 1" spacers with extra long studs.

-Aluminum billet bushings, Cosworth sway bar, Yellow Konis, reinforced subframe, street/autoX spring rates

-proper steel fender flares to relplace plastic OEMs

-stainless fuel lines

-complete rust repair...mother of...if lockdown hadn't happend for 3 months I wouldn't have got the floor completely rebuilt. The transmission cross brace was really the only solid structure to the sides of the car :shock:

-moon roof repair, the bolts were seized in and the plastic was broke on one side. Made repair bracket.

-Italian 3 spoke steering wheel, with hub...really lucked out on finding these.

- information center replaced with 3 gauges [fuel psi, wideband, oil psi], with a digital voltmeter reading cut into an unused idiot light.

-PBR brake upgrade, with stainless braids, yellow Konis, street/autoX coilover spring rates, Cosworth sway bar, 1" spacers with long studs.

-Engine is built for 500+hp, but won't see above 375whp, since everything OEM has a break point of ~400hp :D
The biggest thing is, I am building for broad torque.

-Rotated upper is not gutted. 2wd Cosworth intercooler, with radiator.

-stainless expansion tank, but contemplating getting a Chevy Cruze one to relocate to stock battery location.

-3" Stinger stainless exhaust

-v6 mustang (335 gearset), with Camaro 5th, should be good for highway econo and topping out speedo :twisted:

-Cosworth driveshaft, shortened with custom engine mounts, shifting the engine as far back as possible. Single coolant line piped from intake to heater core line.

-depowered steering, real easy. Used Big R alternator relocator in its place.

-Center vented hood, will have to post pics later.

I am sure I am leaving a few other things out, but its the most beautiful thing on jack stands :lol:

Already have a standalone ECU, S251 turbo, and twin scroll header in the works. Won't be doing any of this till I get the body work done and get a good 500 mile break in.
Post Reply