
Thanks! First I have to get my arse back into an XR-- I'm working on a trade deal-- I go and see the guy tomorrow. Wish me luck!pacwest wrote:then you buy my sway that I have for sale.
lower control arms - sway bar

-
John Brennan

- Level 8
- Posts: 11630
- Joined: Wed Jun 18, 2003 4:19 pm
- Location: Scottsdale, AZ "Summer Is Coming"
-
milehighXR

- Level 7

- Posts: 2317
- Joined: Tue Mar 23, 2004 8:17 pm
- Location: Longmont, Co

control arm bushings
just got a set of "Johns " lower control arm bushings ( big / outer ) and before I tear this thing apart I was curions as to why they dont appear to be anything like what I am seeing in the control arm -- is there more here then I am observing
KEITH
85 XR4TI
88 XR4TI
91 Mark 7
96 town car

GOT ER DUNN
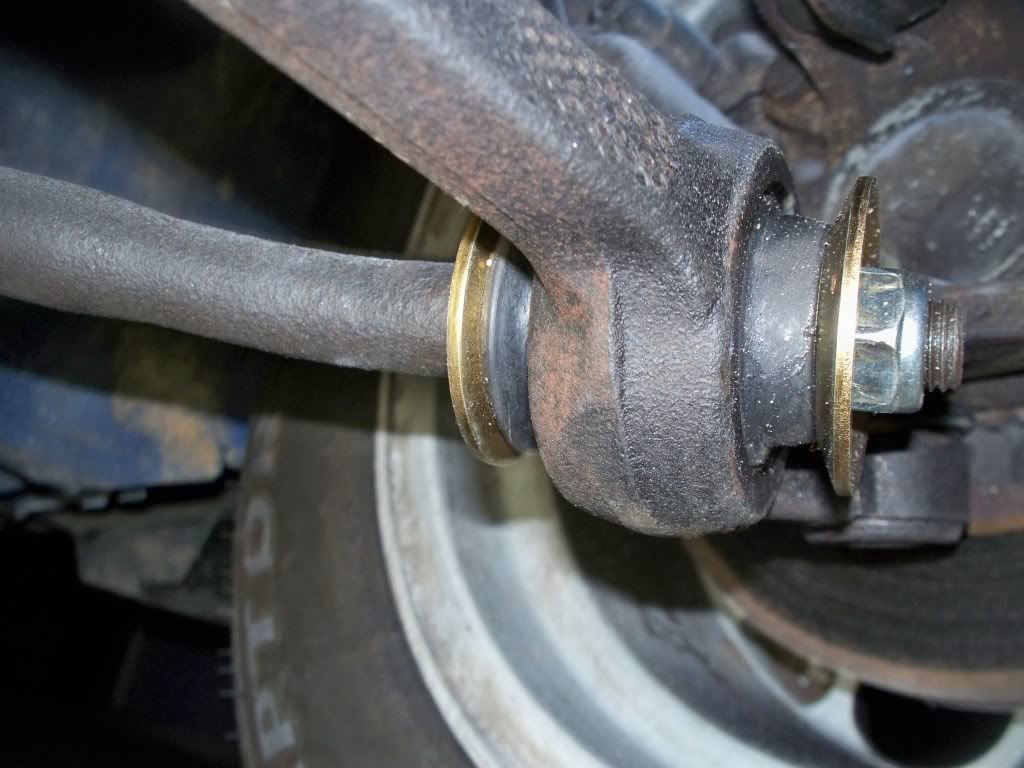
installed Johns bushings today -- followed suggestions did not need radical tooling or violence -- totally removed left control arm -- dropped sway bar -- disconnected sway from the right contorl arm -- installed new bushings -- reattached RH side - installed LH control arm on the sway bar put ball joint back in spindle and then only needed a little push on the strut to get LH inner control arm bolt installed -- pushed sway bar back up into position and all is well in wonderland -- THe camber issue was due to very poorly designed bushings that were on the units that came from Advance Auto PArts -- Johns BUshings look totally different then OEM
( see pict ) but they seem to work well and seat on the inner control arm flange instead of the outter edge -- Does this look like a correct installation
Thanks again to all for the assistance and information --
 [/img][/code]
( see pict ) but they seem to work well and seat on the inner control arm flange instead of the outter edge -- Does this look like a correct installation
Thanks again to all for the assistance and information --
[/img][/code]KEITH
85 XR4TI
88 XR4TI
91 Mark 7
96 town car
-
DPDISXR4Ti

- Site Admin
- Posts: 14824
- Joined: Wed Jan 08, 2003 11:40 pm
- Location: New York
-
Mike McCreight

- Level 7
- Posts: 3987
- Joined: Fri Oct 31, 2003 8:44 pm
- Location: Ottawa! Well, Manotick, actually...
I must have sold 60 sets of those over the years. SO much better than the diaphragms the stock arms come equipped with. I had reports of the rubber cracking and splitting, but they still held the arm in place, and firmly to boot.
When I ordered all those powder coated, polyurethane booted arms a couple of years back, I had them built without any outer bushings... Saves possibly chipping the powdercoating when removing the useless things...
When I ordered all those powder coated, polyurethane booted arms a couple of years back, I had them built without any outer bushings... Saves possibly chipping the powdercoating when removing the useless things...
It's not a hobby, it's an obsession!
-
milehighXR
- Level 7
- Posts: 2317
- Joined: Tue Mar 23, 2004 8:17 pm
- Location: Longmont, Co
Re: GOT ER DUNN
These remind me of the GrpN bushes I have in one of the Scorpios...jetmankt wrote:
Johnny
1 86 XR aka Naomi- my first love, now daily driven project
DCLXVI
1 86 XR aka Naomi- my first love, now daily driven project
DCLXVI
" JOHNS BUSHINGS " = ones I purchased from John Vanlandingham
( see post Sept 24th ) -- great phone contact - John really knows the car and helped me understand what I needed to do to get this put back together -- bushings sent right away and when I had compatibility questions he assured me they would slide right in without an arbor press or other radical procedures -- 100% correct -- they slid right in and bolt up was a breeze and all play / movement / camber issues have been resolved -- thanks again to all for the suggestions and advice.
Now if I could only find a windshield cowl vent panel --
KEITH
85 XR4TI
88 XR4TI
91 Mark 7
96 town car
Re: lower control arms - sway bar
I know this is an old post, but just wanted to share. I just did the struts, lower control arm, tie rod and ball joint, and sway bar bushings on both sides. The biggest issue I had was a snapped off pinch bolt on the strut that had to be drilled out. But, like many others, I ran into issues when I went to reassemble the suspension. The sway bar was over 2" from the hole with no hope of ever getting it in. When I put the sway bar in first, no hope of getting the control arm-to-frame bolt in. After reading this thread, I found it relatively easy to install doing the following:
1) Mount lower control arm to knuckle.
2) Slide LCA onto sway bar and start a few threads.
3) Attach outer ball joint to knuckle.
At this point I ran into an issue. but realized what I was doing wrong. Initially I was trying to raise the control arm up to the mounting hole in the frame, but couldn't get anywhere near it since I was pushing against the sway bar. To finish up I had to:
4) Lift the knuckle assembly with one hand and guide end of the LCA into position. I did need a couple of gentle whacks with a hammer to get it into the slot, but I didn't have to beat it in. Keeping the knuckle up high I was able to get the hole close enough to fit a screwdriver in to hold it, and then to help align the other side and get the bolt started.
5) After tightening up the LCA bolt and nut, pull back down on the knuckle and angle it out toward the side of the car. Pushing down on the knuckle with one hand, guide the strut around the side and into the hole.
6) While pushing down on the knuckle, slowly rotate the knuckle back in toward the vehicle making sure the tab on the strut lines up with the pinch slot.
You will get to a point where the strut pops into position. On one side it moved all the way to where it was ready to be bolted in. On the other I had to slide it up just a bit.
7) Tighten all connections and then attach the center mounts for the sway bar to the body. I used a floor jack to help move them into position and hold the bar in place while I worked at starting the bolts.
This really wasn't that bad to do once I worked it out. The tolerance can be a bit tight in places, but it all went together with a little patience and obligatory cursing.
Hope this can help out others as well.
-
Ed Lijewski
- Level 8
- Posts: 8416
- Joined: Thu Sep 04, 2003 5:53 pm
- Location: The Belly of The Beast
Re: lower control arms - sway bar
My approach:
Fully install tie rods, tie rod ends, each LCA; insert sway bar to one LCA: use a Come-Along hooked into tow chain slot to ratcher/pull other end of sway bar to and into other LCA; snug nuts onto each LCA; use floor jack to raise sway bar so clamp bolts easily thread into frame threads.
YMMV
Fully install tie rods, tie rod ends, each LCA; insert sway bar to one LCA: use a Come-Along hooked into tow chain slot to ratcher/pull other end of sway bar to and into other LCA; snug nuts onto each LCA; use floor jack to raise sway bar so clamp bolts easily thread into frame threads.
YMMV
Descartes: "Cogito Ergo Sum"
Lijewski: "Sum Ergo Drive-O. Mucho!
Lijewski: "Sum Ergo Drive-O. Mucho!
Re: lower control arms - sway bar
Man you guys like to work... 
John Vanlandingham
Sleezattle WA USA
CALL =-> (206) 431-9696 <-= CALL
http://www.rallyrace.net/jvab/
Sleezattle WA USA
CALL =-> (206) 431-9696 <-= CALL
http://www.rallyrace.net/jvab/